Microwave Fried Garlic
This post may contain affiliate links. Please read the Privacy Policy & Cookie Policy.
Viral Fried Garlic, an easy way to make minced fried garlic to flavor rice and eggs (in just minutes), is an easy cooking hack with only two simple ingredients.

Why you should Microwave Garlic.
There are a lot of people that do not prefer to use the microwave method – and I understand that. But a great deal also needs the convenience, time, or ability that a microwave truly provides.
And the microwave can be more than just heating a dinner in a box. From boiling eggs and steaming vegetables to creating herbs and spices like this, the microwave can be an invaluable tool for homemade and kitchen cooking.
Using the microwave to fry garlic means creating custom-flavored garlic anytime and within minutes.
Best Way to Peel Cloves of Garlic
I have this weird garlic peeler thing. It’s like one of those rubber jar lid opener grippy things.
You put the garlic clove on the rubber and roll the clove around, and the skin peels off.
You can hear it cracking and peeling, which is much faster than peeling it with your fingers.
Check out a hands free garlic gripper here.
Ingredients
- 12 cloves of raw garlic, about one head of garlic
- vegetable oil
- salt and sugar

How to Microwave Fried Garlic .
- Trim each end off of each piece of garlic clove. Remove skin and discard. It’s easiest to use a Garlic Peeler like this one.
- Mince garlic and place into a microwave-safe bowl. Cover with enough vegetable oil to cover the garlic.
- Microwave on high for 60 seconds and stir.
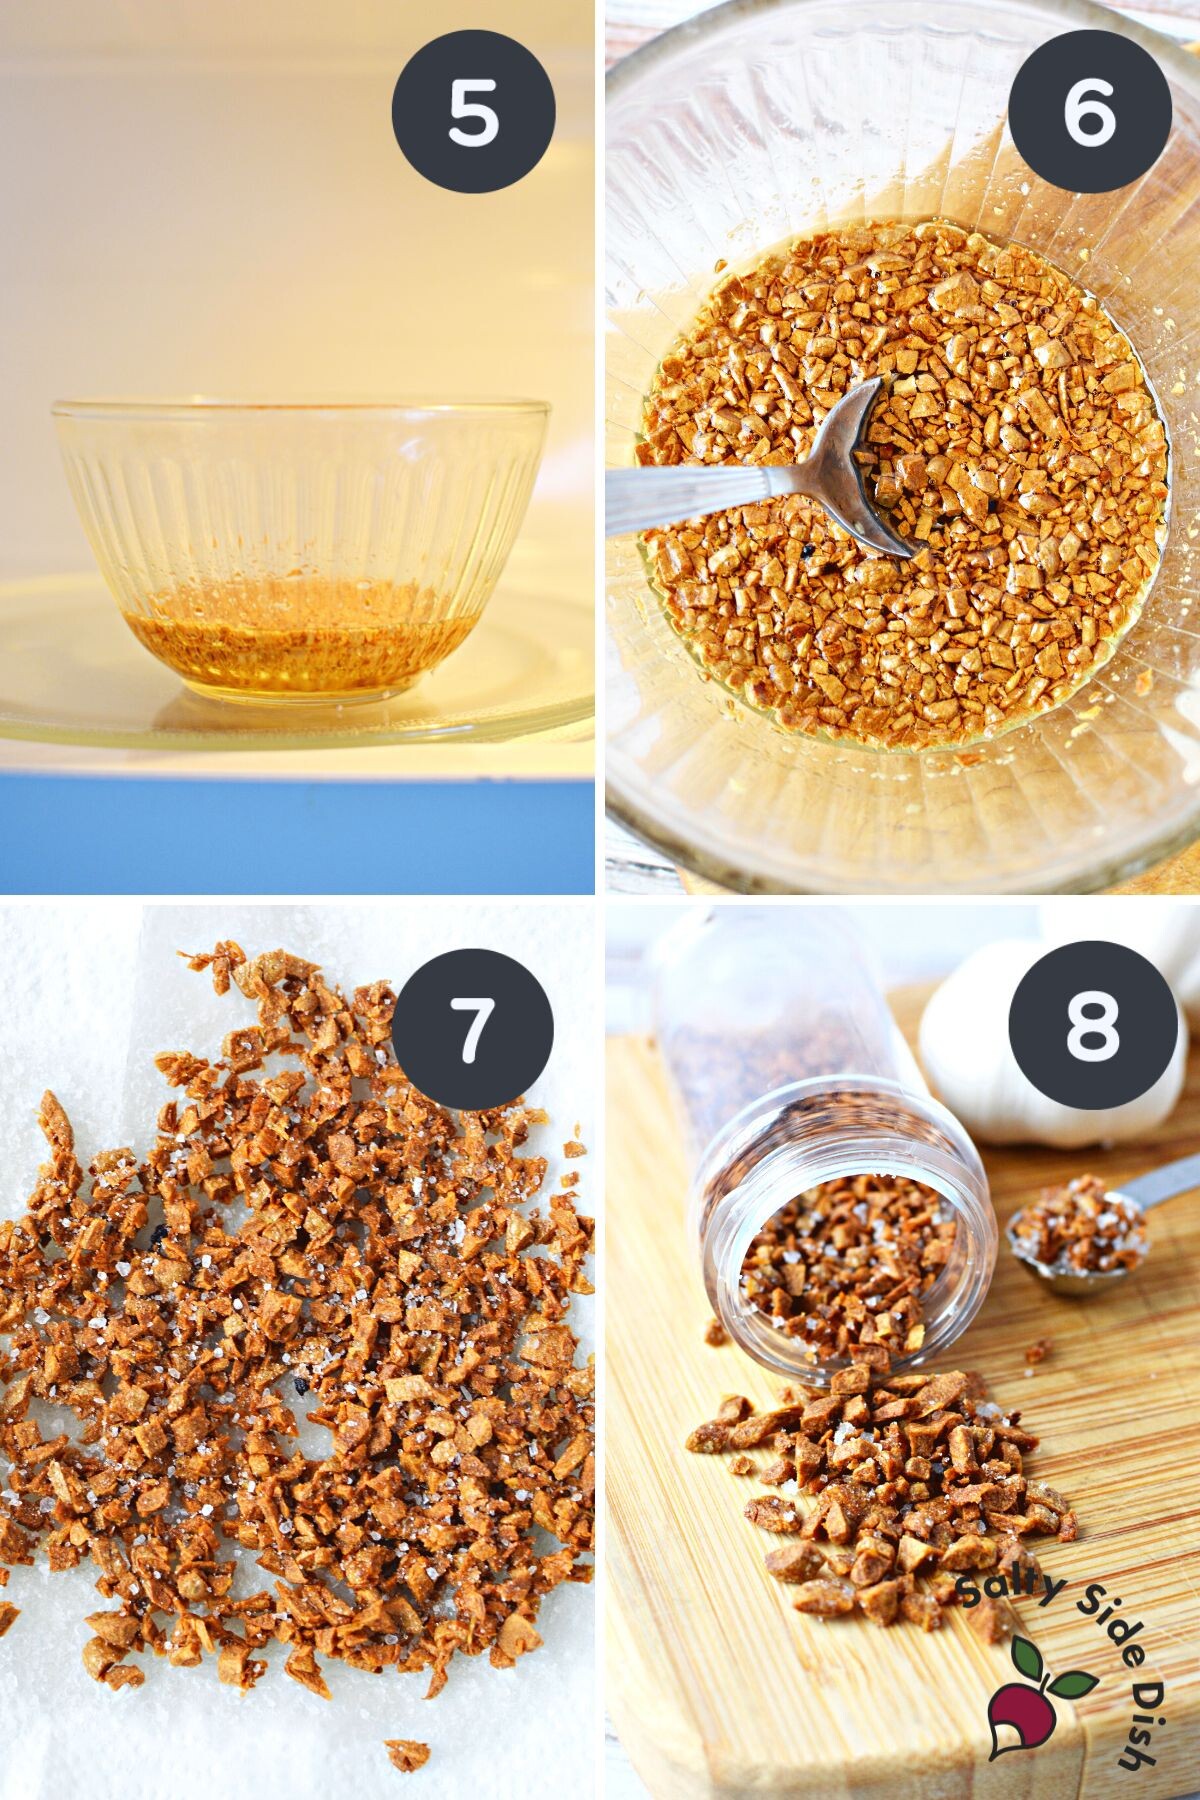
- Continue to microwave in 30-second increments and stir until garlic is browned. I did this five times for 2-1/2 minutes total.

- Continue to Microwave garlic in 15-second increments until a deep brown.
- Strain the oil from the garlic and place it onto a paper towel. (Tip: A fine mesh strainer like a tea strainer works great – it has to be a strainer small enough you do not lose your garlic pieces)
- Sprinkle with kosher salt and sugar. Let fried garlic stand to cool completely.
- Reserve garlic oil to use in other dishes. Use fried fresh garlic in your favorite recipes – salad dressings, leftover rice ideas, or on roasted vegetables.

How to store Fried Garlic
Store bits of garlic at room temperature in a sealed container such as a spice jar.

Fried Garlic vs. Roasted Garlic
Typical Roasted Garlic is the squeezable garlic that pushes out of the cloves. This allows you to make a garlic paste for recipes with serious flavor. It’s also great for making puree on the fly without running to the store.
On the other hand, Fried garlic gives you a golden brown crispy minced garlic topping for salads, rice, pasta, and chicken.
Please note which type of garlic you need before proceeding, as this is a recipe for fried garlic.
How much fried garlic does this recipe make?
Makes 2-3 Tablespoons. The garlic-infused oil can be reserved and reused for other stovetop fried dishes (like making chicken breasts) for additional flavor.
The toasted garlic can season eggs, rice, coconut shrimp, and sandwiches and be added to other recipes to boost garlic flavor.

Tiktok Trending Fried Garlic
You may have seen similar recipes online from TikTok. Here is a great demonstration video by @epicurious on this method.
@epicurious You probably have enough garlic and oil on hand to try this right now, so… #TikTokTaughtMe #TikTokPartner #garlic #condiments #microwaverecipes
♬ Aesthetic – Tollan Kim
How to store Microwave Fried Garlic.
Store in a seasoning jar in the pantry for 2-3 weeks.
How to Roast Garlic in the Oven
If you prefer to roast garlic in the oven (a longer but delicious method), try our Viral Recipes site, where a full recipe is listed step-by-step.

Microwave Fried Garlic
Equipment
- Microwave
Ingredients
- 12 cloves garlic
- vegetable oil only enough to cover garlic in the microwave-safe bowl
- salt to taste
- sugar to taste
Instructions
- Trim each end off of each piece of garlic clove. Remove skin and discard. TIP: Its best to use a garlic peeler for this step. I noted a link in the article so you can see what one looks like – it makes this process simpler.
- Mince garlic and place into a microwave-safe bowl. Cover with vegetable oil.
- Microwave on high for 60 seconds and stir.
- Continue to microwave, in 30-second increments, and stir until garlic is browned. I did this five times or 2-1/2 minutes total.
- Microwave in 15-second increments until a deep brown.
- Tip for this step – use a fine mesh strainer or tea strainer to not lose bits of crispy garlic. Strain infused oil into a container and save it for other recipes. Place fried garlic onto a paper towel to dry and drain excess oil.
- Sprinkle fried garlic with salt and sugar. This helps balance the sharp flavor of the garlic. Can also be seasoned with other herbs and spices.
- Let golden brown garlic bits stand to cool completely.
- Reserve garlic oil to use in other dishes. Use fried garlic in your favorite dishes. Store fried garlic at room temperature in a sealed container such as a spice jar. Makes 2-3 Tablespoons.
Nutrition
Nutritional Disclaimer: The nutritional data provided here is auto-calculated and intended for your convenience only. As it’s generated via automation, its accuracy may be compromised. For precise nutritional insight, please compute the values utilizing the actual ingredients in your recipe through your chosen nutrition calculator or application.
Did You Make This Recipe?
Make sure to follow Salty Side Dish on Pinterest and rate the recipe here and make sure to leave a comment below!


