
Candied Bacon
This post may contain affiliate links, please read our privacy policy for details.
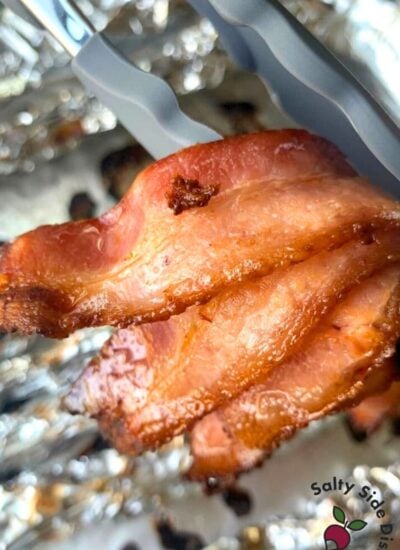
This Maple Candied Bacon recipe is a game-changer. If you thought you knew bacon, prepare to be wowed anew. It’s not just bacon; it’s a sweet, sticky, chewy bacon snack bound to become a favorite.
Enjoy your homemade candied bacon as a luxurious breakfast side, a crunchy salad topping, or a unique addition to your burgers and sandwiches.

Candy Bacon is the Ultimate Snack Upgrade
Next-Level Bacon: This isn’t just bacon; it’s candied bacon. It takes the bacon experience to an entirely new, extraordinary level. The exterior achieves a sticky, candy-like texture that’s utterly addictive.
Simple Perfection: With only four ingredients, this pig candy recipe is shockingly easy to make.
Easy Candied Bacon Recipe
Ingredients
- Bacon (thick cut preferred for best results)
- Brown Sugar (you can use light or dark brown sugar for varying sweetness)
- White Vinegar
- Pure Maple Syrup
Use good bacon. Look for high-quality, thick-cut bacon and pure maple syrup to elevate this dish to “million-dollar bacon” status.
How to make Candied Bacon
Prep Your Baking Sheet:
- Line a baking sheet with foil for easy cleanup.
- Place a wire rack on top of the foil to allow the bacon to cook evenly and become nicely caramelized.
- Arrange slices of bacon in a single layer on the wire rack.

Mix the Glaze: In a small bowl, mix 1/4 cup of brown sugar, two tablespoons of white vinegar, and two tablespoons of pure maple syrup.
This brown sugar mixture is the bacon’s sweet, tangy flavor.

Apply the Glaze: Using a pastry brush, generously apply the brown sugar maple syrup glaze onto the bacon.
Don’t worry if you have some glaze left over; you’ll use it for basting later.

Preheat and bake: Instead of preheating, place your bacon in a cold oven. Then, set the oven to 375 degrees. This gradual heating helps render the fat more effectively, making the bacon crispier.
Bake for 15 minutes to start.

Basting for Perfection: After 15 minutes, carefully open the oven (mind the hot steam) and baste the bacon with the reserved glaze, adding an extra layer of sweetness.
Any sugar that falls below the rack will burn (as sugar does at high heat).
Continue baking, basting every 5 minutes with the glaze, until the bacon reaches your desired level of crispiness, typically within 20 minutes to 35 minutes. The sugar should be beautifully caramelized, and the bacon should have a rich, golden color.

⭐Remember, the total cooking time may vary based on the thickness of your bacon and your oven’s characteristics, so keep an eye on it!⭐
Cool Before Serving: Transfer the candied bacon to a cooling rack, allowing the caramelized sugar to harden and the bacon to cool slightly. This step is crucial for achieving that perfect chewy yet crispy texture.
- While it may be tempting, please note that heated sugar is SO hot. Do not be tempted to pick it up before this million-dollar bacon is completely cooled down.
- NOTE: I cut the maple bacon with kitchen scissors when it was cool.
Brown Sugar Bacon Variations and Tips
Choose Your Bacon:
- You have the option to use regular bacon or thick-cut bacon. Thick-cut bacon is recommended to hold up well against the sweet glaze.
- When working with caramelized sugar and bacon in the oven, keeping an eye on the cooking time is crucial to avoid burning.
Spice It Up:
- Build on classic bacon flavor by adding a kick to your candied bacon. Consider sprinkling red pepper flakes, cayenne pepper, or black pepper over the bacon before baking to create a spicy contrast to the sweetness.
Salty-Sweet Combo:
- For an irresistible salty-sweet experience, lightly dust the candied bacon with kosher salt after baking. This will enhance the flavor and add an extra layer of salt to the sweetness.

Serving Ideas:
Chop the candied bacon into small pieces and mix it into a salty snack for an unexpected treat.
It pairs exceptionally well with our caramel popcorn snack mix.


Visit one of our other delicious bacon recipes above!

Candied Bacon Recipe
Equipment
- Foil
- Baking Sheet
- wire rack
- baster
Ingredients
- 12 oz. bacon
- 1/4 cup brown sugar
- 2 tablespoons white vinegar
- 2 tablespoons pure maple syrup
Instructions
Set Up Your Baking Station Safely:
- Carefully line a baking sheet with foil to catch any drippings, reducing cleanup and preventing any oven fires.
- Place a wire rack on the foil-lined sheet. This allows the bacon to cook evenly without sitting in grease and sugar.
- Lay out 12 oz. of bacon pieces on the rack, ensuring pieces don't overlap for even cooking.
Prepare the Glaze:
- In a small bowl, whisk together 1/4 cup of brown sugar, two tablespoons of white vinegar, and two tablespoons of pure maple syrup. This is the candied glaze mixture.
- Gently brush the bacon with the glaze using a pastry brush, covering each piece evenly. This step is not just for flavor; it also helps achieve that caramelized texture.
Start with a Cold Oven:
- Place the bacon in the oven before turning it on. Starting in a cold oven ensures that the bacon cooks slowly and evenly, reducing the chance of burning the sugar glaze.
- Set the oven to 375 degrees. As the oven warms up, the bacon begins to cook in a gradually increasing temperature, which helps render the fat more effectively and ensures a crispy finish.
Basting:
- After the initial 15 minutes of cooking, carefully open the oven (watch out for any hot steam!) and baste the bacon with more glaze. This adds more flavor and ensures the bacon gets that irresistible sticky-sweet coating.
- Close the oven and continue to bake for another 5 minutes, then baste again. Repeat this process, but always be cautious when opening the hot oven.
Check for Doneness:
- Depending on the thickness of your bacon, it should be perfectly candied in about 25-35 minutes. Keep an eye on it to prevent burning, especially since the sugar in the glaze can caramelize quickly.
Cooling is Crucial:
- Once done, carefully remove the baking sheet from the oven using oven mitts to protect your hands.
- Allow the candied bacon to cool on the rack before serving; this not only makes it safer to eat but also allows the candied coating to set properly.
Notes
Nutrition
Nutritional Disclaimer: The nutritional data provided here is auto-calculated and intended for your convenience only. As it’s generated via automation, its accuracy may be compromised. For precise nutritional insight, please compute the values utilizing the actual ingredients in your recipe through your chosen nutrition calculator or application.
Did You Make This Recipe?
Make sure to follow Salty Side Dish on Pinterest and rate the recipe here and make sure to leave a comment below!
can this be made ahead of time and froze?
I would not.
Best darn bacon ever! Took it hunting and the boys gave me high praise! Thank you. Love the maple!
Yay! I am so glad this was a good hunting recipe for yall. My family does a lot of camping, so you have inspired me to include it on the next trip!